Order of modifiers
view에 두 개 이상의 modifer를 적용할 때, 순서가 중요한 경우가 있다.
padding과 같은 modifer는 view의 layout이나 frame을 변경한다.
background나 border 같은 modifier는 view를 채우거나 감싼다.
일반적으로 view의 layout과 position을 먼저 설정한 후에 view를 채우거나 감싸고자 할 것이다.
예시
Border around padded text
Text("...")
	.padding()
	.border(Color.purple)
Text("...")
	.border(Color.purple)
	.padding()
border를 먼저 하게 되면, 텍스트의 intrinsic 영역을 둘러싸게 된다.
이후 padding을 추가한다면 어디에 추가된 것인지 확인할 수는 있지만, 주위 공간 확보만 되는 것을 알 수 있다.
특정 뷰에만 적용되는 modifer 들도 있다.
예를 들어 다음의 modifer들은 Text 뷰에만 적용된다.

위 수정자들은 전부는 아니지만 일부는 Text 뷰를 반환한다.
예를 들어 font, fontWeight, bold 및 italic은 Text 뷰를 수정하여 다른 Text를 생성한다.
따라서 이러한 modifier는 임의의 순서로 적용해도 된다.
하지만 lineLimit은 some View를 반환하므로 다음에선 에러가 발생한다.
Text(guess.intString)
	.lineLimit(0)
	.bold() // Error!
다음과 같은 순서는 괜찮다.
Text(guess.intString)
	.bold()
	.lineLimit(0)
Creating a custom button style
커스텀 버튼을 사용할 경우, 커스텀 버튼 스타일을 만드는 것이 좋다.
재사용할 계획이 없더라도 코드의 복잡성을 낮출 수 있다.
struct NeuButtonStyle: ButtonStyle {
	let width: CGFloat
	let height: CGFloat

	func makeBody(configuration: Self.Configuration) -> some View {
		configuration.label
		// Move frame and background modifiers here
	}
}
ButtonStyle은 두 가지 property가 있는 ButtonStyleConfiguration을 제공하는 프로토콜이다.
- 버튼의 Label
- 버튼이 눌렀을 때 true인 Bool
Label을 수정하기 위해 makeBody(configuration:)을 구현한다.
struct NeuButtonStyle: ButtonStyle {
	let width: CGFloat
	let height: CGFloat

    func makeBody(configuration: Self.Configuration) -> some View {
		configuration.label
			.frame(width: width, height: height)
			.background(
				Capsule()
					.fill(Color.element)
					.northWestShadow()
			)
	}
}


// Usage
.buttonStyle(NeuButtonStyle(width: 327, height: 48))
Fixing button style issues
커스텀 버튼 스타일을 만들 경우, 기본 label color와 사용자가 버튼을 탭 하는 경우 visual feedback을 잃는다.
label color를 직접 지정하자.
.foregroundColor(Color(UIColor.systemBlue))
커스텀 버튼 스타일을 만들 경우, 버튼을 탭할 때 발생하는 일을 정의해야 한다.
struct NeuButtonStyle: ButtonStyle {
    let width: CGFloat
    let height: CGFloat

    func makeBody(configuration: Self.Configuration) -> some View {
        configuration.label
            .opacity(configuration.isPressed ? 0.2 : 1)
            .frame(width: width, height: height)
            .background(
                Group {
                    if configuration.isPressed {
                        Capsule()
                            .fill(Color.element)
                            .southEastShadow()
                    } else {
                        Capsule()
                            .fill(Color.element)
                            .northWestShadow()
                    }
                }
            )
    }
}
Group
- 또 다른 SwiftUI 컨테이너이다.
- 어떤 레이아웃도 아니다.
- 단일 View 보다 복잡한 코드를 래핑할 때 유용하다.
Modifying font
struct ContentView: View {
	// ...
	var body: some View {
		VStack {
			// ...
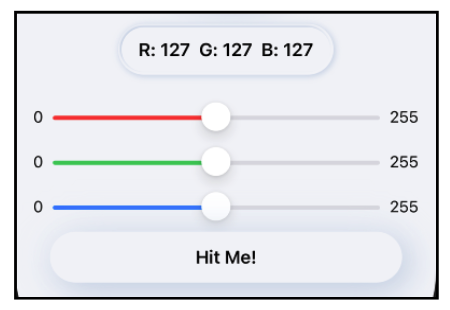
			ColorSlider(value: $guess.red, trackColor: .red)
			ColorSlider(value: $guess.green, trackColor: .green)
			ColorSlider(value: $guess.blue, trackColor: .blue)
			// ...
		}
		.font(.headline)
	}
}

struct ColorSlider: View {
    @Binding var value: Double
    var trackColor: Color
    var body: some View {
        HStack {
            Text("0")
            Slider(value: $value)
                .accentColor(trackColor)
            Text("255")
        }
        .font(.subheadline)
        .padding(.horizontal)
    }
}
- 모든 하위 View에 영향을 주는 VStack에 font를 설정한다.
- 이 Text Modifer를 오버라이드 할 수 있다. (위에서 ColorSlider HStack에 font 추가)

Getting screen size from GeometryReader
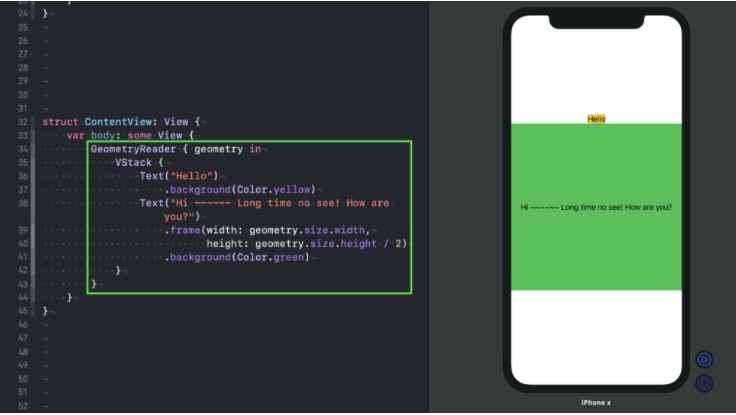
GeometryReader는 frame, size, safeAreaInset 속성이 있는 GeometryProxy 객체를 제공한다.
GeometryReader { geometry in // geometry: GeometryProxy
	// ...
}+추가 설명
GeometryReader는 SwiftUI 에서 부모 뷰(컨테이너)의 크기를 기준으로 View의 frame을 조절하는 방법이다.
https://developer.apple.com/documentation/swiftui/geometryreader
Apple Developer Documentation
developer.apple.com

'도서 > SwiftUI by Tutorials' 카테고리의 다른 글
| [SwiftUI by Tutorials] Chapter 05: Intro to Controls: Text & Image (0) | 2021.10.12 |
|---|---|
| [SwiftUI by Tutorials] Chapter 04: Testing & Debugging (0) | 2021.10.11 |
| [SwiftUI by Tutorials] Chapter 01, 02: Getting Start (0) | 2021.10.06 |

